Tuesday, November 24, 2009

Lemon Blueberry Yogurt Loaf


In my veggie box again this week, Shawn, my veggie guy, added blueberries.  I actually had a hankering for muffins, but stumbled across this recipe for a blueberry loaf/cake type thing that hooked me at first read.  I had everything the recipe called for, and, believe it or not, I DID NOT TINKER WITH IT AT ALL!  Not even one little bit.  Weird, I know, but sometimes I surprise even myself!  It whipped up quickly, and the smell in my kitchen was amazing while it baked.  If you follow the link, Smitten Kitchen gives all kinds of variations you could try.  I am kinda stuck on this one at the moment, but will definite keep it in the repertoire.  The loaf itself is very moist, and as she suggests in the original recipe, needs to be cut very carefully. Try and allow it to cool completely before attempting to slice.  One suggestion she gives that would be divine is doubling the recipe and baking in a Bundt pan.  Maybe with a lemon icing sugar glaze…time for another slice!


Lemon Blueberry Yogurt Loaf (Or, as Smitten kitchen calls it, Lemon Yogurt anything Cake)

1 ½ cups all purpose Flour plus 1 tbsp extra to toss blueberries in
2 tsp baking powder
½ tsp salt
1 cup plain yogurt
1 cup white sugar, plus 1 extra teaspoon for lemon drizzle
3 XL eggs
2 tsp lemon zest (I only needed one, hers suggested 2)
½ tsp vanilla
½ cup vegetable oil (I used olive oil)
1 1/2 cups blueberries, fresh or frozen, thawed and rinsed (miniature wild blueberries are great for this, and pose the least risk of sinking) (I used fresh)
1/3 cup lemon juice, freshly squeezed

Preheat your oven to 350 degrees F, and then prepare your pan.  Grease a large loaf pan, Mine measures about 8 ½ x 4 ½ x 2 ½ inches.  After you grease it, line the bottom of it with parchment, grease the parchment, and then flour the pan.  Set aside.


Whisk together 1 ½ cups flour, the baking powder and the salt, set aside.


In a separate bowl, mix together the yogurt, sugar eggs, zest, vanilla and oil until well blended. 


Slowly add the dry ingredients, stirring till just mixed. 


Toss the blueberries with the remaining 1 tbsp flour, then CAREFULLY fold the berries into the batter, being careful not to over mix.


Pour batter into prepared pan.


Bake in preheated oven for 50 minutes (mine took closer to 70) or until cake tester inserted in middle comes out clean.


While loaf is baking, combine lemon juice and remaining tbsp sugar in a small pot.  Cook until the sugar is dissolved, remove from heat and set aside.


Remove from oven and let rest in pan for 10 minutes. 

Turn out onto a cooling rack, and baste with lemon juice sugar mixture while the loaf is still warm.


Allow to cool before slicing, and don't forget to remove the parchment from the bottom of the loaf.


This is what my kitchen looks like during my baking episodes!


Sunday, November 15, 2009

Eggs Poached in Tomatoes

I spend a lot of time reading food blogs; (no, really, like A LOT!) I think know it has become my latest obsession.  Having a new obsession connect so closely with another obsession (cooking) is both a good thing, and a very bad thing.  On the good side, discovering these food blogs has opened up a whole new world of yummy recipes for me to feed my loved ones with, and it inspired this blog of my own. So far, win-win, right?  On the bad side though, I find myself looking for a recipe that I read somewhere, and end up, hours later, with a whole new list of recipes that I want to try, while I click from blog to blog, eventually forgetting what I was looking for in the first place.  Whole afternoons have been lost while reading posts for things like pear and chocolate cakes, ginger chocolate banana bread, key lime coconut cake, or Dutch baby pancakes. (can you see new blog posts here? I can!)  I end up STARVING by the end of it all, realize I have no time left to cook what I originally set out to find, and end up in need of something quick.  I have a few quick meals that I fall back on, and a lot of them seem to include eggs, because they cook so very quickly, and they are pretty darn tasty with not a lot of fuss.  I will have to do a post on my omelet/frittata thing, but I think it needs a much better name first!  When browsing one afternoon, I found this particular recipe, and I was pretty sure it would become a contender in the “I want something tasty but I need to eat RIGHT NOW” category.   I made it for Jim on a Saturday morning when the boys were both out (it is not really their kind of breakfast) and I was hooked.  I could eat this every day (well, maybe not EVERY day, but you get the point; it is that good). It doesn't get any better than that. My inspiration recipe came from Smitten Kitchen, and had some sautéed greens on the side, which, alas, I had none of at the time.  Feel free to add them if you like, I am sure they would make a very tasty addition.


Eggs Poached In Tomatoes

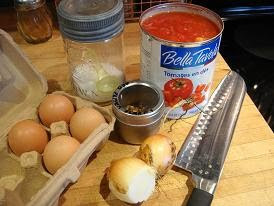
1 28 oz can of diced tomatoes (or use a can of whole ones, and dice them yourself, me—I almost always buy diced!)
1 onion
1 tbsp olive oil
2 cloves of garlic
A pinch of hot pepper flakes (optional)
Salt and pepper to taste
4 eggs
2 pieces of bread, pick your favourite kind, (something with some substance is best, like a yummy sourdough, or multi-grain loaf.  You will want one that won't turn to mush under the tomato egg mixture)

Heat the olive oil over medium high heat in a medium saucepan. Thinly slice the onion, and chop the garlic, and add to the heated oil. Sauté until just starting to soften and brown a wee bit.  Add the tomatoes along with their juices, the pinch of hot pepper flakes (if using), and season with salt and pepper.   Heat to boiling, stirring often.


Break eggs one at a time into a small bowl, and add them to the bubbling tomato mixture. (If you are a pro- egg cracker, you can crack them right into the tomatoes without using a small bowl, a pro I am not!)


Repeat with remaining eggs, spacing them evenly around the pot.


Turn temperature to medium low, and cover the pot. 


Toast your bread; place in a shallow bowl type plate like a pasta plate.


Let the eggs simmer until the yolks are how you like them; ours cooked for 4-5 minutes tops. I prefer the yolks to be just on the thick side of runny.


Using a large spoon or ladle scoop a generous portion of tomatoes out of the pot along with eggs, and place on your toast. Another grind of fresh black pepper, and bon appétit! Simple, delicious and nourishing, all within about 15 minutes. 
Life is good.

Friday, November 13, 2009

Roasted Broccoli and Cauliflower


I am a big fan of roasting veggies.  I used to stick to root type veggies, like sweet potatoes, onions, parsnips, potatoes, onions etc.  I branched out to Brussels sprouts a few years ago, and immediately fell in love all over again with the wee little cabbage guys. Asparagus followed shortly thereafter, and was added to the yum list. I think it was last year that I read somewhere about roasting cauliflower, which, of course, I tried right away.  Wow! Once you have had it roasted, you will never settle for steamed again! It gives it a nutty sweetness that is downright addictive.  So, adding broccoli, it had to be done.  I am hooked.  I think I could eat a whole pan of roasted cauliflower and broccoli myself, it is better than candy (notice I did not say chocolate…)  It is so simple, and looks beautiful, with all those roasty brown tips….OK, now I am getting hungry again!


Roasted Broccoli and Cauliflower
1 large head broccoli
1 medium head cauliflower
Olive oil
Salt and pepper to taste

Cut apart broccoli and cauliflower, and evenly distribute flowerets on large pan with an edge, like a jelly roll pan, or even a large roasting pan.


Lightly drizzle with olive oil, I probably use 3-4 tbsp max, then sprinkle with salt and freshly ground pepper.  My salt of choice is coarse sea salt, use whichever is your favourite. Use hands to mix in oil, S&P, to evenly distribute.


Roast in hot oven for 35-45 minutes, until the edges start to turn a nice dark brown colour.  Be sure to stir a few times during the cooking time.

Great accompaniment to Sticky Sweet Spicy Chicken.

Sweet Spicy Sticky Chicken

We eat a lot of chicken in our house.  As I have mentioned before, we don't eat beef or pork, which narrows the variety of protein choices a bit.  So, I am always looking for different ways to cook chicken. While browsing on the Pioneer Woman Cooks blog the other day, I found this recipe, and it looked so yummy, I knew I had to make it.  It is all she raves about and more.  Mine didn't seem to darken up as much as hers, but the flavour was awesome.  The boys had the sauce drizzled on their rice, and their roasted cauliflower and broccoli.  I think they were going for the straws to suck up what was left in the pan.  My guess is they liked it….

Sticky Sweet Spicy Chicken

1 Cup Apricot Preserves
1/2 Cup Ketchup (I used the spicy ketchup that has been lingering forever in my fridge, and omitted the hot sauce)
1/4 Cup Soy Sauce
4 cloves garlic, minced
2 teaspoons Hot Pepper Sauce
8-12 chicken pieces, bone-in (thighs, drumsticks, your choice, I used 4 of each)

Preheat oven to 400 degrees F. In a small saucepan, mix together apricot preserves, ketchup, soy sauce, garlic and hot pepper sauce. Cook over medium heat, stirring often, till combined and bubbly.


Arrange chicken pieces in a 13 x 9 baking pan. Don't over crowd the dish or it will steam more than bake.  Use a bigger pan if necessary. 


Pour sauce over chicken, making sure to cover all pieces thoroughly.
 
Bake, uncovered, for 45-50 minutes, basting 3 or 4 times during cooking time with accumulated pan sauces.

(If you compare our recipes, I cooked min a wee bit hotter, as I was roasting the broccoli and cauliflower at the same time.  The increased temp and time was fine with the thighs, if you are using all drumsticks, you may need to decrease the time a bit)


Thursday, November 12, 2009

Chili Lime Popcorn


This popcorn was created because of one simple little question. “Hey sweetie, where are those chili lime almonds that were in the cupboard?” Of course, the one thing that I happened to snack on that very afternoon is the one thing that my husband decided he wanted to snack on when he arrived home from work.  “Um, I dunno sweetie, maybe the boys ate them???” (she says with a sheepish grin….)  so, my slightly guilty mind is racing, trying to figure out how to recreate that spicy, crunchy lime flavor, without having to fess up that it was in fact me that ate them.  “What if I make chili lime popcorn?” I throw in hopefully.  The look I received was as doubtful as the thoughts in my head that this might actually work, but, being me, I forged ahead, and was just as surprised as Jim that this actually worked.  When you look at the ingredients, and see lime juice, you will probably get that same doubtful look on your face.  It kind of congers up a vision of slimy popcorn, not really that appetizing, right?  Well, for some karmic reason, it works.  You just need to have a wee bit of adventure in your heart, and a craving for that yummy chili lime flavor...!  If the flavours work for you, it is definitely worth a try.


Chili Lime Popcorn
8-10 cups freshly popped popcorn (popping instructions here)
1 lime (or 3-4 tbsp lime juice if you don't have fresh)
2-4 tsp chili powder (depending on your taste)
Salt to taste

Take your lime and roll it around on a hard surface (counter, cutting board) using fairly firm pressure with your hand.  This helps to release the juice from your lime. It also helps if your lime is room temperature. Cut lime in half thru the middle, and using a juicer, squeeze as much juice from the lime as you can, using both halves. 
Place about 1/3 of your popcorn in a large (very large!) bowl.  Using a teaspoon, use about 1/3 of the lime juice and sprinkle over the popcorn. Follow with 1/3 of the chili powder, and salt to taste. Repeat this process twice, so that the lime and spices are distributed throughout the popcorn. The more chili powder you use, the spicier it will be, so adjust to your taste.

Tuesday, November 10, 2009

Bread Pudding, Dumplings and Goo, Oh My!

Wow, what a treat.  My hubbie and I actually managed to get  a weekday off together.  This doesn't often happen in our house, so it was a day to celebrate.  I offered up all kinds of tasty things to cook for lunch, but his taste buds were calling for some spicy wings.  So, off to our favourite wings and beer place we went, for lunch, just the two of us, in the middle of the day. Wow!  Now, you are probably thinking that this post is in no way related to the title that I picked, but, trust me, I am getting there!  We arrived at Sammy's Rec  Room, and ordered the wings, butter Cajun for the hubbie, and Bundy for me (a mix of hot and honey garlic that is sweet, hot, and delicious!) plus two pints to go with.  Our favourite waiter  Goo (see, part of the title makes sense now…)was working, and somehow we got to talking about food, go figure! One of his staff had a craving for dumplings, and he had made some up for her, just like that. The conversation continued, about the poaching  liquid, the dumplings, and what everyone was doing with them, (some where even being baked if I recall)  Anyway, he brought out a few samples for us, some rolled in the butter Cajun chicken wing sauce, and some sprinkled with cheese.  Goo makes a mean dumpling, who knew? Tasty tasty! (I still think they should go on the menu, dumpling appetizers..A whole new concept!) The conversation then turned to the bread pudding , that he was making right then, which unfortunately was still in the oven when we left, so we didn't get to try it. But this lunch time conversation left me with 2 cravings that need to be attended to, ASAP!  Hence the title of this blog, get it now?! I knew the bread pudding would have to wait when I found this recipe for chicken and dumplings on the Smitten Kitchen website.  To the grocery store for leeks and chicken thighs I went.  Thanks Goo! Your dumplings were an awesome segue to an amazing meal, and this blog!

This recipe takes a wee bit of time to cook, so be sure to leave enough time to let the chicken simmer, I step I somehow missed when I previewed the recipe, which left a very hungry teenager lurking in my kitchen for the last half hour of the cooking time, trying to eat everything that wasn't nailed down.  

I barely changed the recipe, which is odd for me, like REALLY odd, but it sounded pretty much perfect the way it was.  My only changes were due to what I had in my kitchen, hers had sherry, I used white wine, and I used thyme instead of  tarragon.  Other than that, the recipe was amazing, as is.


Smitten Kitchens Chicken and Dumplings with Leeks and Tarragon

Stew (make this part first, do not start the dumplings until this part is complete!)
5 pounds bone-in, skin-on chicken thighs (I bought 2 packages with 9 thighs in each)
Sea salt and fresh ground black pepper
4 teaspoons olive oil
4 tablespoons butter (1/2 stick)
2 medium leeks , white and light green parts only, cut in half lengthwise, rinsed and cut into 1-inch pieces
1 large onion, minced
6 tablespoons unbleached all-purpose flour
1/4 cup white wine
4 1/2 cups low-sodium chicken broth
1/4 cup whole milk
1 teaspoon minced fresh thyme leaves
2 bay leaves
1 cup frozen green peas
2 tsp dried thyme

Dumplings
2 cups unbleached all-purpose flour
1 tablespoon baking powder
1 teaspoon table salt
1 cup whole milk
3 tablespoons reserved chicken fat (or unsalted butter)

For the stew: Pat the chicken dry with paper towels, then season with salt and pepper. Heat 2 teaspoons of the oil in a large Dutch oven over medium-high heat until just smoking. Add half of the chicken and cook until golden on both sides, about 10 minutes.

Transfer the browned chicken to a bowl and remove the browned skin. (Use tongs, it is HOT!) Pour off the chicken fat and reserve. Repeat with remaining chicken, remembering to save any excess chicken fat, you will need it for the dumplings.


Add the butter to the Dutch oven and melt over medium-high heat.


Add the leeks, onion, and 1/4 teaspoon salt and cook until softened, about 7 minutes. Stir in the flour. Whisk in the wine, scraping up any browned bits. Stir in the broth, milk, thyme, and bay leaves. Nestle the chicken, with any accumulated juices, into the pot.

Cover and simmer until the chicken is fully cooked and tender, about 1 hour. (mine was done in about 45-50 minutes)

Transfer the chicken to a cutting board.

Remove and discard the bay leaves. Let the sauce hang out for a few minutes, then skim the fat from the surface using a wide spoon.

After the chicken cools a bit, shred the meat from the bones, and return it to the stew. Discard the bones. Leave on burner to simmer.


Dumplings: Stir the flour, baking powder, and salt together.

Microwave the milk and fat in a microwave-safe bowl on high until just warm; in my microwave it took about 40 seconds. (do not over-heat).

Stir the warmed milk mixture into the flour mixture with a rubber spatula until just incorporated and smooth. Over-mixing will make your dumplings tough.


Stir in the peas and tarragon into the simmering stew, and season with salt and pepper.

Gather a golf-ball-sized portion of the dumpling batter onto a soup spoon, then push the dumpling onto the stew using a second spoon.


Cover the stew with the dumplings, leaving about 1/4 inch between each. You should have about 18-20 dumplings.  Reduce the heat to low, cover the pot, and cook until the dumplings have doubled in size.


SK suggested 15-18 minutes, mine took more like 25, much to the dismay of the hungry teenager!