Saturday, October 31, 2009

Crispy Caramel Corn


I love caramel corn. Actually, I love almost anything caramel, that creamy, sweet, buttery, sticky, almost burnt sugar flavour is one of my favourites, hands down. It is right up there with really good chocolate, on the very top of my sweets list. (It is a really big list!) But, again, I digress! Back to the caramel corn.  One would think, given my love for all things caramel that I would have attempted to make this before now.  I have no idea why I haven’t! So, for Halloween this year, I decided to give it a go.  This is not a recipe that is done quickly; though it is not difficult, it is a bit time consuming, so if you are going to make it, allow for a few hours in the kitchen.  The last hour just requires stirring, so you can turn your attention elsewhere if you have a good timer to call you back to the oven.  The cooling process didn’t take as long as I thought it might, my only issue was keeping all the not-so-little fingers out of it before I packaged it up to go into my nieces and nephews treat bags!  I found a recipe on allrecipes.com that gave very good reviews, (http://allrecipes.com/Recipe/My-Amish-Friends-Caramel-Corn) and used this for the basis of my attempt. My major tweak was switching the butter for the margarine called for, because butter is always better, right? It seems like a lot of butter, but hey, it is caramel corn, it is meant to be decadent!  I also took out the peanuts, so feel free to add a few cups of nuts of your choice to the popcorn prior to adding the caramel.
 The resulting caramel corn that I did manage to save from the vultures that are my boys, was very tasty.  Addictively tasty.  Now I am thinking about how to make maybe a chipotle maple version, sweet and salty with heat…now that sounds delicious!

Crispy Caramel Corn

7 quarts plain popped popcorn (see my method for popping popcorn at the bottom of this post)
2 cups brown sugar
1/2 cup light corn syrup
1 teaspoon salt (omits if using salted butter, unless you are like me and like the salty sweet combination)
1 cup Butter
1/2 teaspoon baking soda
1 teaspoon vanilla extract


Spread the popped popcorn into two shallow greased baking pans, removing any unpopped kernels that you can. I used my large jelly roll type pans, but you can use roasting pans, disposable roasting pans, anything large and with a bit of a side. Set aside.
 Preheat the oven to 250 degrees F (120 degrees C).
Combine the brown sugar, corn syrup, butter and salt (if using) in a medium sized pot. Bring to a boil over medium heat, stirring enough to blend.


Once the mixture begins to boil, boil for 5 minutes while stirring constantly.


 (Here is where my laptop comes in really handy. I have some counter space on the right hand side of my stove, and generally while I am cooking, this is where my laptop sits.   When I need to spend any amount of time stirring something, to save boredom, I turn to my favourite blogs, and read while I stir. The time goes much faster, when you occupy yourself with delicious reading!)

Remove from the heat, and stir in the baking soda and vanilla.


This makes the mixture foam up a bit, and it becomes light and airy. Spoon the caramel mixture quickly over the popcorn in the pans, and stir to coat as best as you can. This was a wee bit messy, don’t worry about getting every kernel in contact with the caramel, it will be mixed a few times while it bakes, and this distributes it further.


Bake for 1 hour in the preheated oven. Every 15 minutes, take the pans out and stir the popcorn around to further distribute the caramel.  
While it is in the oven, you will need to find a large area to cool the caramel corn when it is finished in the oven.  I cleared off a large section of my island, and lined it with wax paper. Dump the finished corn out and separate the pieces. Make sure to cool completely before putting into airtight containers or baggies, or it won’t stay crispy.

Yield: A lot! Unless you have vultures like mine, then it doesn’t make enough!
 
Popping Popcorn, the old fashioned way!


In a large pot with a lid, (mine is about 6 quarts or so) place about 2 tbsp of some kind of oil, my favourite is coconut oil, but you can also what you like.  Add 1 cup of popcorn kernels and place pot on burner.


Turn burner on medium high, and place lid on pot but do not seal, have it angled away from you to allow steam to escape.  


Hold a tea towel around the front edge of pot to prevent being splashed by hot oil, steam or kernels.  Shake pot gently to keep kernels moving.  It won’t take long, so do not leave unattended!  Remove from heat when the rapid popping slows down considerably, about 3 to 5 seconds between pops. Immediately remove from heat and remove lid.

Voila! Beautiful popcorn, ready for topping!


Friday, October 30, 2009

Bundt Pan Banana Bread


We go thru bananas in our house like a pack of monkeys. No matter how many I buy, I always seem to be stopping at the grocery store to get more a few times a week. The dogs even love them. As soon as you peel one, they are both sitting pretty by your feet, waiting for their customary bite. And, should it be a particularly good banana, and you forget to share, well, you can expect the cold shoulder for at least 5 minutes, from both of them!

So, when I get the urge to make muffins, banana bread, or anything similar, I need to buy ones that are already “ready” to cook with, because they never last long enough to go brown here. When we were at our favourite little fruit market today, there was a perfect bunch, spotty and browned, just waiting for me. I took it as a sign that today was banana bread day.
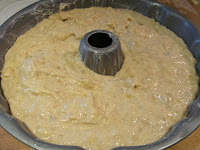
This recipe makes a lot of batter. (As much as we like bananas, we seem to like banana bread more…) It will do 2 loaves nicely, but I prefer to cook mine in my Bundt pan. I like the even way it cooks, and it just looks so much nicer, I am sure you could even ice it and serve it as cake! (Oh, what a thought, maybe a nice dark rich chocolate icing…..I am going to have to try that!) The original recipe came from the Silver Palate cookbook; this is my “tweaked” recipe, for my Bundt pan.


Bundt Pan Banana Bread

Makes 1 Bundt pan or two loaf pans (would work for muffins too, would probably make 3-4 dozen though, and cooking time would be substantially less, around 20 minutes would probably do)

½ cup olive oil
½ cup butter, softened
¾ cup white sugar
¾ cup brown sugar
4 eggs
2 cups unbleached all purpose flour
2 cups whole wheat flour
2 tsp baking soda
1 tsp salt (I use coarse sea salt, feel free to use your favorite)
6 large ripe bananas, mashed with a potato masher
2 Tsp vanilla


Liberally grease your Bundt pan. (Seriously, this is one place not to be lazy; getting something out of a Bundt pan when it sticks is not fun, at all! I grease mine with a paper towel and a big smear of softened butter)


In stand mixer, cream together oil, butter, and sugars. Beat for about 3 minutes, until creamy, and lighter in colour. Continue beating while you add in the eggs, one at a time. When eggs are well incorporated, turn off mixture, and measure the flours, baking soda and salt into the bowl. Mix on LOW (unless you want to give your kitchen a flour bath…) until just combined. It is good to still see bits of dry flour. Over mixing of baked goods like this makes them tougher and drier, I think it has to do with the gluten in the flour being released. Good for yeast type bread, not so good for quick breads.) Turn off mixer again, add mashed bananas and vanilla, and again mix on low until just nicely combined. Again, do not over mix. (If you do not have a stand mixer, just use a large bowl, and stir ingredients together in the same order, mixing with a large wooden spoon or rubber spatula)


Pour batter into pre-greased Bundt pan and bake in center of oven, preheated to 350 degrees. Bake for 60-65 minutes, or until a cake tester comes out with a few moist crumbs, (not wet batter).
Cool in the pan for 10 minutes, then invert onto a rack and cool completely before cutting (if you can…)


PS: I have since made this with the addition of 2 espresso shots (or if you can find instant espresso powder, 2 tsp of that), and a cup of chocolate chips...Wow!! 

Wednesday, October 28, 2009

Crispy Purple Smashed Potatoes


A while back I was reading a magazine of some sort at work, I think it may have been the LCBO one, but I am not quite sure.  In the magazine was a recipe using purple potatoes, roasted with some kind of vinegar and salt.  So, to Shawn, my veggie man I went, and asked if he could get purple potatoes.  Obliging, as always, he found some, but he could only get them in 25 lb bags. That is A LOT of purple potatoes! Not to worry, he said, he would keep looking for a smaller amount.  So, I kind of forgot about them, and carried on with other recipes and such.  But, one beautiful fall Sunday afternoon, didn’t he show up on my doorstep with a beautiful little bag of purple potatoes, “All Blue Creamers” to be exact, that he had found while at a fall fair. Oh the excitement! I couldn’t wait to use them in that recipe….but….where did it go???  Not only had I forgotten about the purple potatoes, I had also forgotten where I saw the recipe!  Thus began my quest, which still remains unfulfilled.  If anyone out in blog land has an idea of what it was, I would love to hear from you.  So, needless to say, I had to find another way to use these little purple beauties.  Most everything I found had them mashed, or used in a potatoes salad, but the roasting and the vinegar was still stuck firmly in my taste buds, so I had to improvise.  While I was browsing on The Pioneer Woman cooks blog, I came across a recipe for Crash Hot Potatoes that looked very interesting. (So interesting, in fact, that the guys at work were drooling over the picture on the computer monitor!)  Hers called for herbs to be sprinkled on top before the baking part, but I my taste buds were still stuck on the vinegar thing, so I ran with that.
Here is my version of the recipe, tweaks and all!


Crispy Purple Smashed Potatoes
2lbs smallish purple potatoes, (other small new ones would do, Just omit the purple from your recipe name or people will look at you funny!)
Olive oil
Coarse sea salt
Freshly ground black pepper
Malt vinegar (I am sure your favourite vinegar would work here, this just seemed to pair naturally with the potatoes)

Bring water to boil in a large pot, add potatoes and cook till tender when poked with a fork.  When they are done, remove from pot and place on a pan well coated with olive oil, leaving space in-between.  Take a potato masher or a large fork and carefully mash the potato, trying to keep it as intact as possible.  This takes a wee bit of skill to hold the hot potatoes on the oily pan, but you will catch on quick, I did!  In the original recipe, she mashed first one way, then turned the masher and did it the other way.  My potatoes where quite small, and one “smash” seemed to give the desired result. The pioneer woman’s analogy of making a “cookie” from the potato is quite appropriate. 


When you have all the potatoes smashed, drizzle with olive oil, then sprinkle with coarse sea salt and freshly ground black pepper.  Roast in a 450 degree oven on the top rack for about 25 minutes, or until the potatoes are crispy and starting to brown.
Remove from oven and sprinkle with malt vinegar. Serve hot!

Monday, October 26, 2009

Raspberry Crumb Coffee Cake


In my veggie box this week, Shawn, my veggie guy, gifted us with LOTS of raspberries, knowing that our youngest has a very soft spot for them.  (He has been known to eat an entire container or more by himself, which, when it comes to snacks for a 12 year old boy, could be A LOT worse,  I know! But, it leaves none for the rest of us…which causes issues, to say the least).  So, I decided today to make something with them before Isaac could eat them all.  Smitten Kitchen had an awesome crumb coffee cake recipe on her site, using rhubarb, but also with the suggestion that other berries would be just as good.  I was convinced!  My recipe differs slightly, as usual, a tweaker I am and always will be! I doubled it, and made some changes with what I had in my kitchen at the time.  It is in the oven as I am typing this, and the smell…is…divine…I made this with the intention of taking it in to work tomorrow, I am having  doubts it will make it that far!
 
Raspberry Crumb Coffee Cake
Preheat oven to 325 degrees. 
Grease a 9x13-inch baking pan.


Fruit:
1 lb raspberries (I used about 3 of the little 6oz clamshell containers)
2tsp lemon zest
6 Tbsp sugar
2 Tbsp cornstarch
Combine GENTLY so the raspberries hold their shape, set aside.
Crumb topping:
½ cup butter, melted
½ cup olive oil
½ cup brown sugar
½ cup white sugar
2 tsp cinnamon
3 cups all purpose flour
Mix together the butter and olive oil in a large bowl.  Add sugars and cinnamon, and stir until combined.  Mix in the flour with a wooden spoon or spatula. It mixes to make a very solid dry-ish dough. Leave it pressed together in the bottom of the bowl and set aside.

Cake:
3 eggs
2/3 cup yogurt (if you use sweetened, you can decrease the sugar to ½ cup if you like) (SK used sour cream, but I didn’t have any)
2 tsp vanilla
2 cups flour
¾ cup sugar
1 tsp baking soda
1 tsp baking powder
½ tsp salt (if your butter is salted, omit this…I was out of unsalted)
1 stick (1/2 cup) butter, softened

Whisk together eggs, yogurt and vanilla, set aside.  In large bowl on stand mixer on low, blend together the flour, baking powder, baking soda and salt if using.  Add butter and ½ cup of yogurt mixture and mix on medium speed until flour is moistened. Increase speed and beat for 30 seconds scrapping down the sides of the bowl. Add ½ of remaining yogurt mixture, and beat for 20 seconds. Add final amount of yogurt mixture, scraping down the sides of bowl with a spatula and beat for final 20 seconds. Scoop out about 1 cup batter and set aside.

Spread remaining batter into prepared pan. Carefully Spoon fruit mixture over batter, and then drop the batter that you set aside by tablespoonfuls over top of the fruit. Gently spread the spoonfuls out just a bit.
Using your fingers and a soup spoon, break crumb topping mixture into big crumbs, about 1/2 inch to 3/4 inch in size, and sprinkle to cover the top of the cake/fruit with the crumb chunks. (this makes the crumbs big and chunky, and oh so sneak-ably good!)
Bake cake until a toothpick inserted into center comes out clean of batter (it might be moist from the fruit), 55 to 65 minutes.


Cool completely before serving. (If your kitchen smells anything like mine, good luck with this step…)

Thursday, October 22, 2009

Chipotle Black Bean and Pumpkin Chowder


I took a quick trip to the grocery store this morning, and, thinking it was warmer outside than it really was, left my coat at home. By the time I returned home, the chill had set in, and I decided it was a soup day. A friend of mine, Paul, mentioned on Face book this morning that he was making Corn chowder with roasted red peppers, which sounded really, really yummy (and I am still waiting for pictures!). Not wanting to copy him, I decided to make a Black Bean Pumpkin Soup that I found a while back on the Smitten Kitchen Blog. Between her ingredients and my cupboards, there were a few holes, though, so here is the recipe that I came up with. The chipotle gives it a nice smoky heat, perfect for a cool fall day! The Smitten Kitchen recipe called for ham, so here I substituted the black forest chicken.

Chipotle Black Bean and Pumpkin Chowder

 
2 Tbsp Olive Oil
1 tbsp butter
3 cloves garlic, diced
1 large onion, coarsely chopped
1 Tbsp cumin
3 cups pumpkin puree
1 can black beans, rinsed (19 oz)
1 can diced tomatoes with juice (28 oz)
2 cups chicken stock
4 thicker slices of black forest chicken, diced
2 Tbsp chipotle tobacco sauce
Salt and pepper to taste


Heat oil and butter in large soup pot. Add onion, garlic and cumin, sauté over medium high heat until onion is starting to brown. Add the rest of the ingredients and bring to a boil. Reduce heat and simmer for about 20 minutes. (My stock and pumpkin were both frozen, so it took a bit to come to a boil) At this point I used my immersion blender, and coarsely pureed the soup, making sure to leave it a bit chunky. You could omit this step altogether, or puree it totally, depending on how you like your soup. I think the next time I make this I would add the diced chicken after the pureeing process.

The Smitten Kitchen recipe topped the soup with some brined and baked pumpkin seeds, which would have made a very nice addition. But, being as I used frozen pumpkin puree, and not fresh, I had no seeds to brine. Definitly something to try soon though!

Wednesday, October 21, 2009

The Ultimate Chocolate Chip Cookie


This morning, my wonderful teenage son presented me with a smallish piece of paper, and said two words to me, with a grin on his face.  The words were “Chocolate Chip”, and the piece of paper was “Bunny Munny”.   (Bunny Munny, I should explain, is something I started with my boys probably 5 years ago, at Easter.  Instead of filling all those plastic eggs with loads of candy, I started filling some with Bunny Munny “coupons” for use during the rest of the year.  Their favourites seem to be the ones that they can redeem for some kind of food. (Second runner up is the “get out of chore free” one, or the one to have their room cleaned by me—I still wonder at my wisdom in including those ones….)  Anyway, Mac presented me with his Bunny Munny for “a batch of cookies, flavour of his choice”, which was chocolate chip, not really a big surprise.  Chocolate chip cookies are a favourite in this house, and surprisingly, the recipe is the same every time I make it.  I haven’t even deviated from the original recipe that came out of the Betty Crocker cook book that was a wedding present 16 years ago.  That, for me, is just shy of amazing, being the recipe tweaker that I am.  The recipe does call for nuts, which I omit, being a chocolate chip cookie purist! I use my stand mixer, and always butter, never margarine.  That is personal choice, but I do believe it makes a difference, as it does with most baking. I also use the “Presidents Choice Decadent Chocolate Chips”, personal preference again, they are the best!

Chocolate Chip Cookies From The Betty Crocker Cookbook, 7th Edition
 
¾ cup granulated sugar
¾ cup brown sugar
1 cup butter, softened
1 egg
2 ¼ cups unbleached all purpose flour
1 tsp baking soda
½ tsp salt (omit if using salted butter)
1 cup coarsely chopped nuts (optional)
12 oz semisweet chocolate chips


Heat oven to 375 degrees.  Mix sugars, butter and egg. (I use my stand mixer, and cream very well, 3-4 minutes at least on medium speed!) Stir in flour, baking soda and salt, dough will be stiff. (If using stand mixer, mix till just starting to hold together in larger crumbs)  Mix in chocolate chips and nuts if using. (If using stand mixer, mix these in by hand, this will finish incorporating the dough as well)

Drop dough by rounded teaspoonfuls about 2” apart on ungreased cookie sheets.  Bake for 8-10 minutes or until light brown. Centers will be soft.

Cool slightly; remove from cookie sheet. Enjoy! (be sure to let them hang out on the cookie sheets for a minute or two to firm up, or they will fall through the cooling rack...trust me!)